How to send Systeme.io emails from your own domain, step by step
Verify a sender, add the four DNS records, tag your contacts and send a first newsletter from your own domain on the Systeme.io free plan, with the snags we hit.
ToolDebrief earns a commission if you buy through some links on this page. It costs you nothing extra and never changes the verdict. How this works.
Systeme.io gives you unlimited emails on its free plan, but it will not send a single newsletter
until it knows who the sender is. Sending from an address on your own domain, such as
hello@yourdomain.com, takes four steps and one wait. We went through all of them on 14 November
2026 while testing the free plan for our Systeme.io review. This is
the exact order that worked, and the places where it did not.
Before you start
You need:
- A Systeme.io account. The free plan is enough.
- A domain you control, and access to its DNS settings at your registrar or host.
- A mailbox on that domain that can receive email, because Systeme.io sends a confirmation link to it.
Why not just use Gmail? You can verify a Gmail or other free address in a few minutes. But marketing emails sent “from” a free address through another company’s servers are more likely to land in spam, because the free provider cannot vouch for them. An address on your own domain, with the domain authenticated, avoids that. Our test email from our own domain reached the Gmail inbox, not spam.
Step 1: create a mailbox on your domain
If your domain already receives email, skip this step.
Our domain is with Hostinger, where we created the mailbox in hPanel under Emails, picking
the domain and then a hello mailbox with its own password. hPanel also added the DNS records
the mailbox needs (MX, SPF, DKIM and a basic DMARC record).
Check your other DNS records afterwards. When we switched email on, the domain’s existing Google Search Console verification record disappeared from DNS. Google rechecks that record, so losing it would eventually have cost us access to Search Console. We added it back, next to the new SPF record. If you verified your domain with Google or anyone else through a TXT record, look for it after any email setup.
Step 2: add the address as a sender in Systeme.io
- In Systeme.io, open Settings, then Emails.
- Under Verified email addresses, click Add new email address and enter your address.
- Open that mailbox and click the confirmation link Systeme.io sends.
The address now shows as Verified, but with a warning icon. Hover over it and Systeme.io explains that you still need to authenticate the domain. Until you do, the address does not appear in the sender list when you write a newsletter.
Step 3: authenticate your domain
On the same settings page, under Domains, click Add new domain and enter your domain
without www. Then click the eye icon under DNS settings to see the records to add.
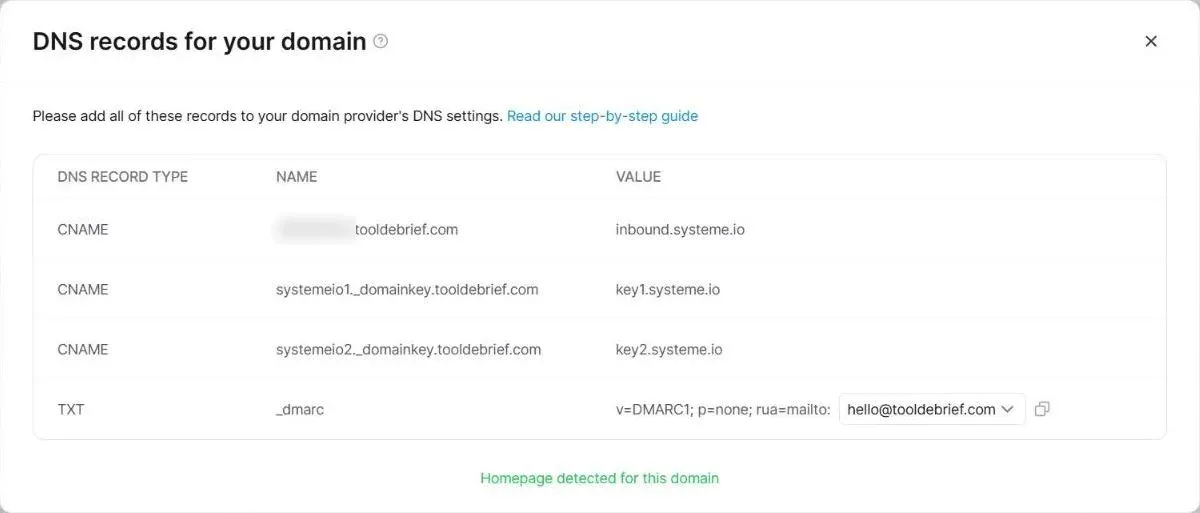
Add these at your DNS provider:
| Type | Name | Value |
|---|---|---|
| CNAME | si followed by a number (shown on your screen) |
inbound.systeme.io |
| CNAME | systemeio1._domainkey |
key1.systeme.io |
| CNAME | systemeio2._domainkey |
key2.systeme.io |
| TXT | _dmarc |
v=DMARC1; p=none; rua=mailto: plus a report address |
Three things to get right:
- Names. Most DNS panels add your domain to the name automatically. Enter
systemeio1._domainkey, notsystemeio1._domainkey.yourdomain.com, or you end up with the domain twice. - Only one DMARC record. If your domain already has a
_dmarcrecord (ours did, from the email setup), replace it rather than adding a second one. Two DMARC records count as none. - The report address is public. The
rua=mailto:address goes into public DNS, where anyone can read it. Systeme.io’s dropdown suggested the account’s login address, which for many people is a personal inbox. Pick an address on your own domain instead. The dropdown only changes the text shown for you to copy; it is not a saved setting.
To confirm the records are live, look them up in a public DNS checker or run:
nslookup -type=CNAME systemeio1._domainkey.yourdomain.com 8.8.8.8Ours showed up on Google’s and Cloudflare’s public DNS within a minute.
Step 4: wait for the domain check
This is the part you cannot speed up. Systeme.io checks the domain on its own schedule, and there is no button to run the check again. The only option in the domain’s menu is Delete. We did not try deleting and re-adding the domain, since that could mean setting the records up again.
Our records were correct within a minute, but the domain stayed Pending for hours and switched to Verified later the same day. If yours is still pending after a full day and the records check out, contact Systeme.io support from the chat bubble in the dashboard.
Step 5: tag the people who should get the newsletter
A Systeme.io newsletter is sent to tags, not to your whole contact list. A newsletter with no tag warns that no one will receive it.
- Open CRM, then Tags, and create a tag, for example
newsletter. Tags cannot be created from the newsletter screen or from a contact page. - Add the tag to your contacts, or set up your sign-up form’s automation to add it to everyone who subscribes.
The free plan allows one tag and one automation rule, so spend them on this.
Step 6: write and send the newsletter
- Open Emails, then Newsletters, and click Create newsletter.
- Fill in the subject and sender name, and pick your address under Sender email address. It appears only once the domain is verified.
- Choose the visual editor or the simple text editor, and save.
- Write the email. In the Recipients panel, under Tags, include your tag.
- Open the arrow next to Save draft. Save and test sends a preview to you only, and Save and send sends it to everyone with the tag, after a confirmation.
Read the email before you press send. In our test, the simple text editor dropped characters when long lines were typed quickly, cutting sentences off mid-line. Typing in shorter bursts fixed it.
If something goes wrong
| What you see | Likely cause | Fix |
|---|---|---|
| The sender list says “No options” | The domain is not verified yet | Finish step 3 and wait for step 4 |
| The address is “Verified” with a warning icon | The domain is not authenticated | Step 3 |
| The domain stays “Pending” | Systeme.io has not re-checked yet, or a record is wrong | Check the records on public DNS; contact support after a day |
| “Without a tag, no one will receive this newsletter” | No recipient tag chosen | Step 5 |
| Sentences cut off in the email body | The editor dropped typed characters | Retype in shorter bursts and check before sending |
| Search Console or another service lost verification | Email setup replaced a TXT record | Add the old verification record back |
How long it takes
The clicking takes about 30 minutes, most of it in your DNS panel. The wait in step 4 can take most of a day, so start it before you write the newsletter.
If you have not signed up yet, you can start on the Systeme.io free plan without a card. For the rest of the free plan, including its limits and pricing, read our Systeme.io review.